Sunday, 19 May 2013

HOW TO MAKE PAYMENT:

So after you have received your inventory after that you have to make payment to that vender.
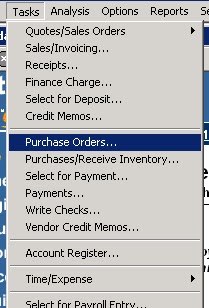
For making payment first you to click on the “tasks” option and than “payments”.


When you click on the “payment” a window will open like:


You can also select this “payment” window from navigation Aids by following the path and clicking on the “payment”. Same window will be open as above.


In the middle part top 2nd option is for “payment”. This is navigation Aids instructions.
Same window for the “payment” will appear like:


In this window you have to fill this information:
  1. Vender ID 
  2. Date (on which you are making payment)
  3. Pay to the order of (on which address)
When you select the “vender” this window will change like:


So now if you select the date within the discount period your discount will be showing in the discount column and if you make payment after discount period that discount will not be shown.

Than you have to enter the “Discount Account” from the charts of account’s list.
When all these necessary information filled out you just only have to click on the “pay” and your payment will be made.

ThaNk y0u...!!!


Tuesday, 14 May 2013


How to save a purchase order:
After making all the records for Customers, venders and inventory now its time to make “purchase order”.
For making the purchase order first you have to active your Navigation aids. Click on “options” tab and than tick on Navigation aids option in the list
.

After this you can select Navigation on the welcome screen or from the top menu option “tasks” than “purchase order”.


On clicking the “purchase order” window will open for making the purchase order like:


In this purchase order you have to fill the necessary information for making the any kind of purchase.

  1. First you have to fill the Vender ID (already saved)
  2. Ship to information.
  3. Date (on which you are making this purchase order)
  4. Good thu (date on which you want your goods)
  5. PO # (every purchase order have its own unique number)
  6. Quantity (how much you demand)
  7. Item (already saved)
  8. Unit price


Filling all these information you just save this “purchase order” and can issue also.

How to make changing in purchase order:

If you did not write the PO #, ship to information, wrong quantity or wrong date than you can correct it.
For this you have to click on the “open” button in the purchase order window.


When you click on the “open” button a window will open like:


From this window you can select the purchase order that you want to correct or make any amendments.
You double click on any purchase order and that purchase order will open and you can correct anything you want and than save it again.


When receive Inventory:

So when you receive your inventory you have submit this in the receive inventory form.
First you click on the “task” and than on “Purchases/receive inventory”.


On clicking this option a window will open like:


Now from this you select your desired vendor and this window goes change like:


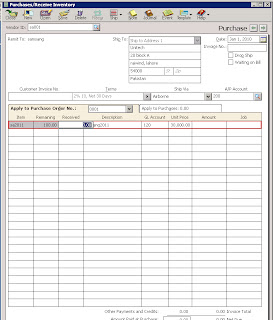
In this on the “Apply to purchase order no:” you select your desired PO # and that will open like:


So now in this window you just only have to fill the received inventory quantity and that is it.

Thank y0u...!!!


HOW TO MAINTAIN INVENTORY:

After making detail for “Customers “and “venders” its time to maintain “items” record that you are dealing with.

For this first you have to click on the “maintain” option than click on the “Inventory items” a window will open like:


After you click on the “Inventory items next window will open with the name “maintain inventory items” like:


Now in this window two areas exist:

  1. Header field
  2. Tab area
In “header field” you have to fill the three options.


 First is “item ID” in which you assign a specific ID to that items as we did for customers and venders.
Secondly we write “description for our that specific item. Like “Shoes, shirts, raw material, etc..
Than the third and last option in header field is “item class”. In this we write that our item is of what class like “stock item, non-stock item, store item etc..

After filing this area we move on towards the “tab area” in which three tabs exists.


In this area the first Tab is “General”


In General tab we fill the information for “description” like this item is for what purpose sale or purchase.
Than the price level for that item. We can choose the price level by clicking the very next button of this column.


We can choose any price level for this item from this list.

After that we have to fill the tax type for this item, last unit cost that we had charge for this item, cost method for this like “FIFO, LIFO, and Weighted avg” and than the three General Ledger accounts like “sales account, inventory account and cost of sales account”.
After that we fill the UPC/SKU this is related to forwarding companies, Item type again for this item, location of this item, measuring unit means in what unit we are measuring this item, weight of this item, than the “Minimum stock” means what will be the minimum quantity for this item and also the reorder quantity, and in the last “purchase vender ID” this ID we had already made in the vender option and “burger ID” this will be the ID that our vender has been assign to us. Than the last “beginning balance”.

So by completing all the huge and necessary information in first “General” tab we click on the next tab that is “Custom fields” :


In this tab we have to fill the available options like “alternative Venders” means if there is any other vender for this item than we can thin about them, “substitutions” means is there any substitute for this item that we write here, “special note” means if any note that we want to write for this item so we write here.

After filing the “Custom fields” we click on the next tab that is “History”:


In the history we can see the record for this item that preciously when and on what coast it had been sale.
The remaining two tabs can’t be open or highlighted at this time.

Thank you.!!!


HOW TO MAINTAIN VENDORS:

When you have done the customers you have to make record for your all vendors.
For this you need to click on the “Maintain” then on the “Vendors”.

When you click on the vendors a window will appear like:


There is two parts of the window:
  • Header field
  • Tab area
Header field:


You have to fill out the “vendor ID, Name and Inactive” in the header field.


Tab area:

There are four tabs in this area.

First is “General”. In this you have to fill the personal information of the vendor that how and what person we have to contact for this vendor.


Second is “Purchase defaults”:


In this you need to fill the “purchase representative” and most important the “purchase account”.

Third tab is “Custom fields”:


In this you keep extra information about your vendor like “office manager, account rep etc”.

And the last on is “History”:


In this you keep the record of your vendor like “since when this is your vendor, what is the last invoice date, last invoice amount, etc”.


How to maintain Default information of Vendors:

For this click on the “Maintain”, “Default information” and then “Vendor”.


When you click on this option a window will appear like:


There are four Tabs in this window.
First is “payment Term”. You need to select the standard term (C.O.D, prepaid etc) and default term (2/10, net 30) and also you have to give the “Purchase account” and “Discount GL account”.


Second is “Account Aging”:


From this window you make your invoice aged by “Invoice” or by “Due Date” and also the categories.

Third is “Custom fields”:


this you enable or disable the custom fields’ information that appear in the vendor’s custom field.

And the last is “1099 Settings”:


This window is not relevant to us.

Thank you.!
This window is not relevant to us.