Tuesday, 14 May 2013


How to save a purchase order:
After making all the records for Customers, venders and inventory now its time to make “purchase order”.
For making the purchase order first you have to active your Navigation aids. Click on “options” tab and than tick on Navigation aids option in the list
.

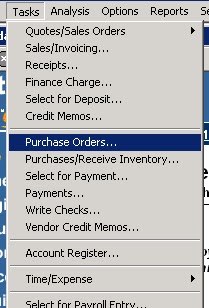
After this you can select Navigation on the welcome screen or from the top menu option “tasks” than “purchase order”.


On clicking the “purchase order” window will open for making the purchase order like:


In this purchase order you have to fill the necessary information for making the any kind of purchase.

  1. First you have to fill the Vender ID (already saved)
  2. Ship to information.
  3. Date (on which you are making this purchase order)
  4. Good thu (date on which you want your goods)
  5. PO # (every purchase order have its own unique number)
  6. Quantity (how much you demand)
  7. Item (already saved)
  8. Unit price


Filling all these information you just save this “purchase order” and can issue also.

How to make changing in purchase order:

If you did not write the PO #, ship to information, wrong quantity or wrong date than you can correct it.
For this you have to click on the “open” button in the purchase order window.


When you click on the “open” button a window will open like:


From this window you can select the purchase order that you want to correct or make any amendments.
You double click on any purchase order and that purchase order will open and you can correct anything you want and than save it again.


When receive Inventory:

So when you receive your inventory you have submit this in the receive inventory form.
First you click on the “task” and than on “Purchases/receive inventory”.


On clicking this option a window will open like:


Now from this you select your desired vendor and this window goes change like:


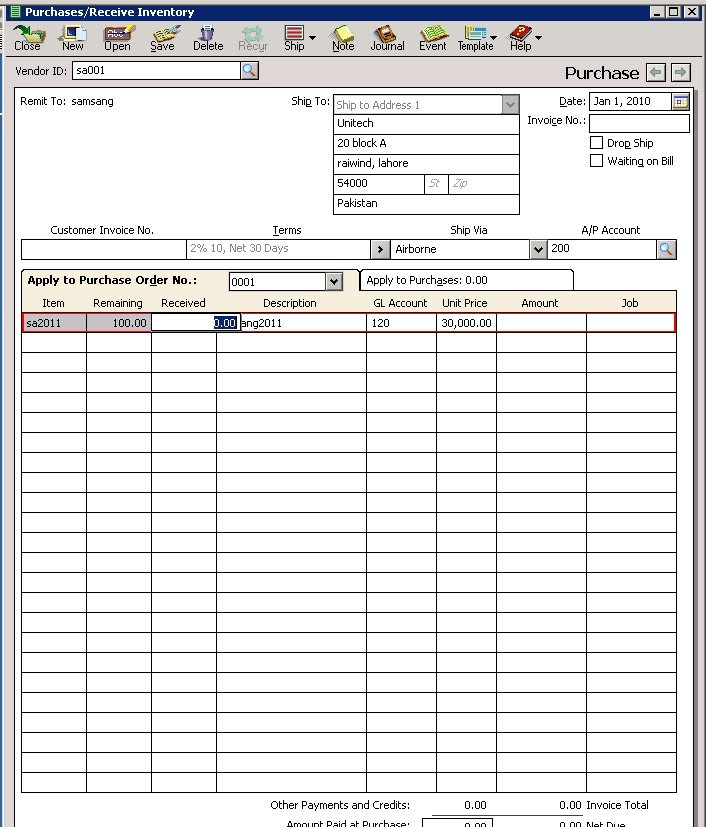
In this on the “Apply to purchase order no:” you select your desired PO # and that will open like:


So now in this window you just only have to fill the received inventory quantity and that is it.

Thank y0u...!!!


HOW TO MAINTAIN INVENTORY:

After making detail for “Customers “and “venders” its time to maintain “items” record that you are dealing with.

For this first you have to click on the “maintain” option than click on the “Inventory items” a window will open like:


After you click on the “Inventory items next window will open with the name “maintain inventory items” like:


Now in this window two areas exist:

  1. Header field
  2. Tab area
In “header field” you have to fill the three options.


 First is “item ID” in which you assign a specific ID to that items as we did for customers and venders.
Secondly we write “description for our that specific item. Like “Shoes, shirts, raw material, etc..
Than the third and last option in header field is “item class”. In this we write that our item is of what class like “stock item, non-stock item, store item etc..

After filing this area we move on towards the “tab area” in which three tabs exists.


In this area the first Tab is “General”


In General tab we fill the information for “description” like this item is for what purpose sale or purchase.
Than the price level for that item. We can choose the price level by clicking the very next button of this column.


We can choose any price level for this item from this list.

After that we have to fill the tax type for this item, last unit cost that we had charge for this item, cost method for this like “FIFO, LIFO, and Weighted avg” and than the three General Ledger accounts like “sales account, inventory account and cost of sales account”.
After that we fill the UPC/SKU this is related to forwarding companies, Item type again for this item, location of this item, measuring unit means in what unit we are measuring this item, weight of this item, than the “Minimum stock” means what will be the minimum quantity for this item and also the reorder quantity, and in the last “purchase vender ID” this ID we had already made in the vender option and “burger ID” this will be the ID that our vender has been assign to us. Than the last “beginning balance”.

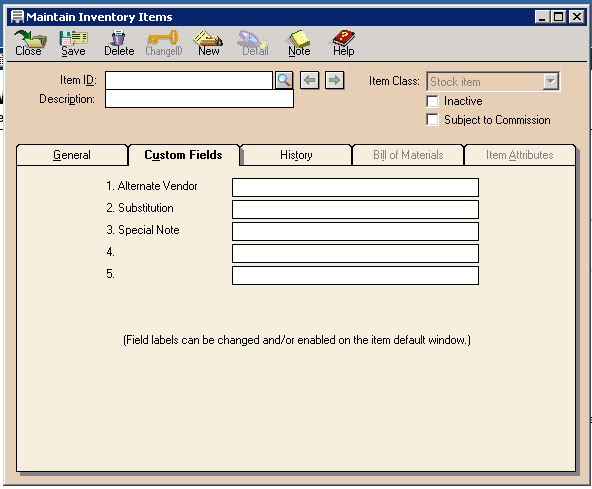
So by completing all the huge and necessary information in first “General” tab we click on the next tab that is “Custom fields” :


In this tab we have to fill the available options like “alternative Venders” means if there is any other vender for this item than we can thin about them, “substitutions” means is there any substitute for this item that we write here, “special note” means if any note that we want to write for this item so we write here.

After filing the “Custom fields” we click on the next tab that is “History”:


In the history we can see the record for this item that preciously when and on what coast it had been sale.
The remaining two tabs can’t be open or highlighted at this time.

Thank you.!!!


HOW TO MAINTAIN VENDORS:

When you have done the customers you have to make record for your all vendors.
For this you need to click on the “Maintain” then on the “Vendors”.

When you click on the vendors a window will appear like:


There is two parts of the window:
  • Header field
  • Tab area
Header field:


You have to fill out the “vendor ID, Name and Inactive” in the header field.


Tab area:

There are four tabs in this area.

First is “General”. In this you have to fill the personal information of the vendor that how and what person we have to contact for this vendor.


Second is “Purchase defaults”:


In this you need to fill the “purchase representative” and most important the “purchase account”.

Third tab is “Custom fields”:


In this you keep extra information about your vendor like “office manager, account rep etc”.

And the last on is “History”:


In this you keep the record of your vendor like “since when this is your vendor, what is the last invoice date, last invoice amount, etc”.


How to maintain Default information of Vendors:

For this click on the “Maintain”, “Default information” and then “Vendor”.


When you click on this option a window will appear like:


There are four Tabs in this window.
First is “payment Term”. You need to select the standard term (C.O.D, prepaid etc) and default term (2/10, net 30) and also you have to give the “Purchase account” and “Discount GL account”.


Second is “Account Aging”:


From this window you make your invoice aged by “Invoice” or by “Due Date” and also the categories.

Third is “Custom fields”:


this you enable or disable the custom fields’ information that appear in the vendor’s custom field.

And the last is “1099 Settings”:


This window is not relevant to us.

Thank you.!
This window is not relevant to us.


Sunday, 21 April 2013


Maintain Customers/prospects:

After when you complete with the charts of account now you have to maintain the information of your customers and their prospects.
For this first you have to click on the “Maintain” button on the top of Peach-tree software's tool bar and than select the first option “Customers/reports”.


Click on the Customer/Prospects and the next window will open like:


So here are many options in this window.

Two parts are containing this window.
  1. 1.       Header field
  2. 2.       Tab area. 


Header field:
The area containing “Customer ID, Name, Promote and Inactive option” are called header field.


Tab area:
The area containing five tabs like “general, sales defaults, payment defaults etc” are called tab area.


As we assign the IDs to the different accounts so here we do the same work for our customers.
In customer ID we can assign any number to our customer but it can not be the same as we assign to our previous customer if we have.
Than we write the “name” of that customer or organization like “Ahmad or Ali & co”.

Now come to the tab area. And the first tab is “General”.


In this tab we have to write customer’s contact information. In first we write the name of company or the name of that person to contact for that company.
And than bill to address. This option is used for where to bill to invoice this customer.
Than you have to write the address of that customer, city Zip code, sales tax amount, customer type, telephone number, fax, E-mail and website.
Sales tax is different for different types of sales. And customer type is used for to filter for any customer.

Than the second tab that is “sales defaults”   


In this tab you have to write the sales representative person, who had sales this inventory or goods to this customer.
After that you have to select the general, ledger account number for that customer. And P.O #, ship via etc.

Third Tab is for "default payment" if that customer will make or had made.


If the customer pays the amount through card than the card number and the holder of that card’s name is written in these columns. And also the complete address and expiry of that card.


Fourth option is "customer field".


In this different options will be asked by you. And you can put different asked information like “Account dpt no, references, mailing address, multiple sites for that customer etc”.

And last and the fifth Tab is for “History” of that customer.


In this tab you can keep record of that customer that since when this was our customer, what was the last invoice date to this customer and what was the amount. And also that when this customer had made last payment to our company etc.


CUSTOMER DEFAULT INFORMATION:

After when we have made necessary information for our customers, we now have to make a default information record for our customers.
For this first we have to click on the “Maintain” option and in that option “Default information” and than “Customer”.


When you click on the customer a window will open like:


First default tab for the customers is “payment term”. It means that how a customer has to made payment and on what time.

First option on the radio button is C.O.D (cash on demand  means cash has to pay on the time of transaction imminently.
Than prepaid means cash had to be paid before transaction by the customer.
Than the due in number of days. Here you can select a policy that if a customer made payment before the due date than you will allow him/her the specific discount.
Next option is same as the previous option but it will be due on the next month’s day.
And the last is for the end on the month payment term.

Click on the next TAB that is “Account Aging”:


In this tab two option are present. One is “Invoice date” means the number of day for the payment is counted by the date of issuing the invoice.
And “Due date” means that the number of days for the payment is counted by the due date that is decided at the time of transaction.
Than the three categories for aging of payment. You can change it by yourself according to your requirement.

Click on the next TAB that is “Customer fields”:


Here are five fields you can fill in any kind of contact information by yourself, like if you want that in the 3rd column there should be sales’s department number instead of “Mailing list” than you can remove it and write the information as you desire. And also you can “enable” or “disable” any of these options.

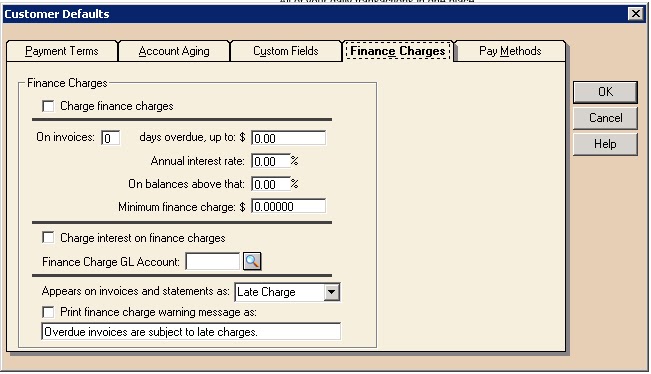
And after that click on the next TAB “finance charges”:


Here you can change the finance charges that you want to charge to customers.
On invoice option is used to extend the days for the payment that how many days a customer can delay the payment by the invoice date. Means after how many days this customer will be shown as default. And than days overdue amount means that on what amount will be default charges start, what will be the rate and on what balance these default charges will be start. And in the last what will be the minimum default charges due, means what will be the default charges’s minimum amount.

Thank you.!!!


Sunday, 31 March 2013

HOW TO MAINTAIN CHARTS OF ACCOUNTS

Now we have establish the company for our record in Peach-tree.
so its time to make charts of for our company.

First set up is to open the charts of accounts window. This can be done by opening the peach tree software. On the upper left corner of the window there will be a maintain option.


now from this toolbar you have to select the option of "Maintain" and a drop-down list will be appear like:


from here you select the charts of account option and next window will be appear like this:


this is the main window for making charts of accounts for a company.
In this window different options we have to fill out for the charts of the company. These options will have to be fulfilled:

  1. Account ID
  2. Description
  3. Account type
Different account IDs will be given to each account so that it will be found quick and easily in the working process of the company.
In the description column you have to type the full detail for that account like "account receivable, petty cash, rent expense" etc.
And than you to select the Account type for that specific account. this account type will be given or assign by the software itself..

So after completing all this necessary information for your account this window will be look like:


After fulfilling this all information and completing the work you will press "ALT+S" buttons to save this account for the charts.

If you want to check that how many accounts you save and what account IDs you have assign to them, you have to press the "look-up" button very next to account ID's column.
by pressing that button you can see the window like:


So this work ends here.

you can also see the list of your accounts by clicking on the "report" button in the main toolbar.


from this you click on the report button and than "general ledger" 


after pressing the "General ledger" new window open like:


from this you can check any account's report by double clicking on that account.
when you click on "charts of account" next window will open like:


here you can check your account's details now.


HOW TO MAKE CHANGES IN SAVED ACCOUNTS

After making charts of accounts and assigning ID's to them if you realize that the account ID was not b correct than you can change that ID.
For this purpose you have to type the account ID and your account appears like:


when you can select that ID and click on "change ID" button on the upper toolbar and after that software will ask you to write new account ID for that account:


after entering the new ID you will press the OK button and your account ID will be changed to new one.

So you can also delete the existing account. first you click on the "look-up" button all accounts will b shown and than you highlight the account that you want to delete like:

 so when you highlight the account click on the "delete" button on the top and that account will be delete.


HOW TO ENTER BEGINNING BALANCES:

For entering the beginning balances first you have to select the "Beginning balances" by clicking on the "Beginning balances" button on the Maintain charts of account button. that is like:


when you click on the this button a window will be open like:


so from here you have to select the date that is beginning and ending on the same date.
And when you select that period and click on the ok button next window will be open like:


now here you have to enter all the balances that you have assign to your accounts.
after fulfilling this balances this window will be look like:


Be careful when you are entering the account balances because if it is not correctly filled than this charts couldn't be equal on debt and credit side.
If it is not equal than the deference will be posted to "Beginning balance equity".

It is the end of "charts of accounts". Thank you..!!!